

Fundamentals
Core
Master
Shaders
Introduction to Shaders
It's finally time to dive into the world of shaders. They are essential for creating all kinds of visual effects. In this chapter, we will learn about shaders, what we can achieve with them, and how to use them in React Three Fiber.
Prelude
Before we start, I want to mention that shaders can take some time before you get used to them. It works differently than the rest of the code we've written so far. It's a new way of thinking and creating visual effects. But don't worry, I will guide you through the process, we will start with the basics, and gradually move to more advanced topics.
Don't feel discouraged if you don't understand everything at first. It's normal. It's a new concept, and it requires practice to get more comfortable with it. I recommend you to take your time, experiment, and practice, but I promise you, it's worth it! Shaders are incredibly powerful and will give you the control to create any visual effect you can imagine.
Additionally, we all have different learning styles. Some people learn better by reading, others by watching videos, and others by doing. For this topic in particular, cross-referencing different sources can be very helpful. I will share with you resources at the end of this chapter to consolidate your knowledge and go beyond what we cover here.
I hope I didn't scare you and that you are excited to learn about shaders. Let's get started!
What are Shaders?
Shaders are small programs that run on the GPU (Graphics Processing Unit). They are written in a language called GLSL (OpenGL Shading Language), which is similar to C.
They are used to position the vertices of a mesh (Vertex Shader) and to colorize each pixels of the faces (Fragment Shader).
Actually, we've been using shaders all along. When we create a material, we are using a shader. For example, when we create a MeshBasicMaterial, we are using a shader that colors the mesh with a single color. When we create a MeshStandardMaterial, we are using a shader that simulates lighting, shadows, and reflections.
Vertex Shader
A vertex shader is a program executed for each vertex of a geometry. Its primary responsibility is to transform the vertices from 3D space (our 3D world) to 2D space (our screen or viewport). It achieves this transformation by utilizing several matrices:
- View Matrix: This matrix represents the position and orientation of the camera in the scene. It transforms vertices from world space to camera space.
- Projection Matrix: This matrix, either perspective or orthographic, converts vertices from camera space to normalized device coordinates (NDC), preparing them for the final projection onto the 2D screen.
- Model Matrix: This matrix encapsulates the position, rotation, and scale of each individual object in the scene. It transforms vertices from object space to world space.
Additionally, the vertex shader also incorporates the vertex's original position and any other attributes associated with it.

For each vertex of the geometry, the vertex shader will be executed.
Finally, the transformed position of the vertex in 2D space is returned via the predefined variable gl_Position. After all vertices are transformed, the GPU interpolates the values between them to generate the faces of the geometry, which are then rasterized and rendered onto the screen.
Fragment Shader
A fragment shader, also known as a pixel shader, is a program executed for each fragment (or pixel) generated by the rasterization process. Its main task is to determine the final color of each pixel on the screen.
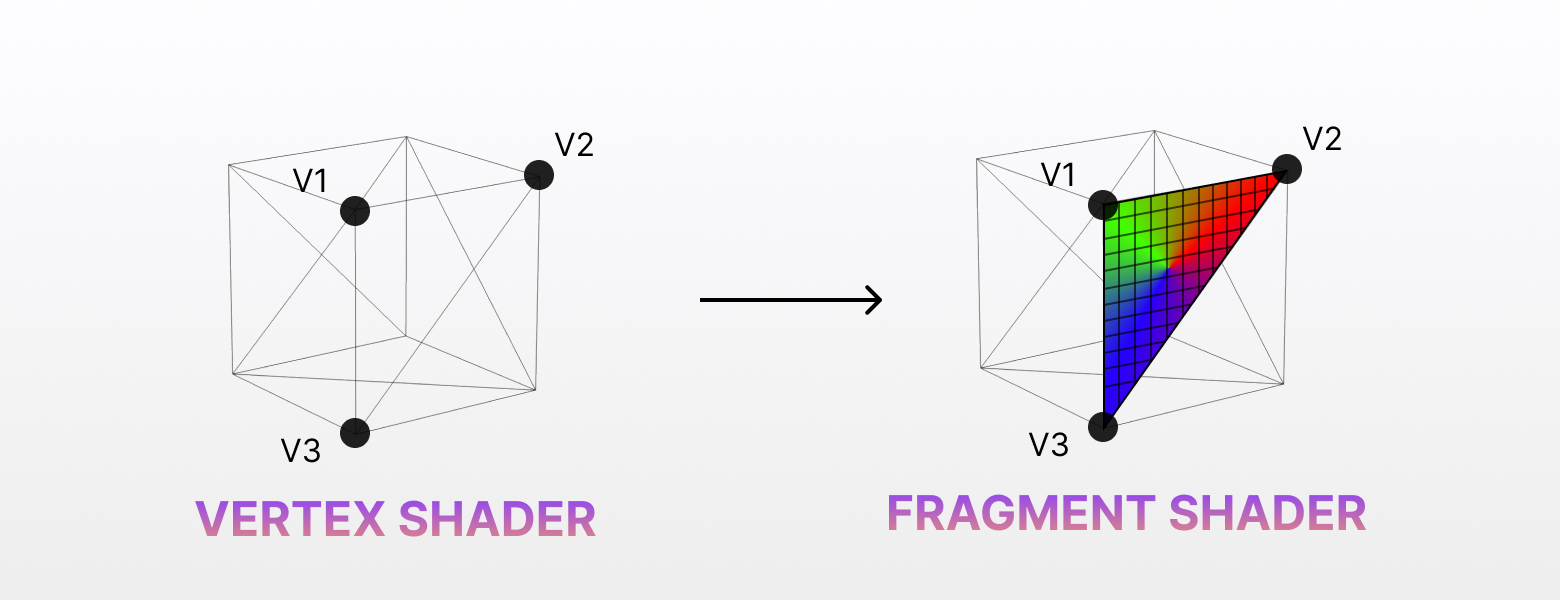
For each fragment generated during rasterization, the fragment shader will be executed.
The fragment shader receives interpolated values from the vertex shader, such as colors, texture coordinates, normals, and any other attributes associated with the vertices of the geometry. These interpolated values are named varyings, and provide information about the surface properties at each fragment location.
In addition to interpolated values, the fragment shader may also sample textures and access uniform variables, which are constant across all fragments. These uniform variables can represent parameters such as light positions, material properties, or any other data required for shading computations.
We will come back to attributes and uniforms later in this lesson.
Using the input data, the fragment shader performs various computations to determine the final color of the fragment. This can involve complex lighting calculations, texture mapping, shading effects, or any other visual effects desired in the scene.
Once the color computation is complete, the fragment shader outputs the final color of the fragment using the predefined variable gl_FragColor.
I tried as much as possible to explain shaders in a simple way and omitted on purpose some technical details, but I understand that it can still be a bit abstract. Let's create a simple shader to see how it works in practice.
Your First Shader
Let's run the starter pack. You should see this frame with a black plane in the middle of the screen:

Open the file ShaderPlane.jsx, it contains a simple mesh with a plane geometry and a basic material. We will replace this material with a custom shader material.
shaderMaterial
To create a shader material, we use the shaderMaterial function from Drei library.
It takes 3 parameters:
uniforms: An object containing the uniform variables used in the shader. Keep it empty for now.vertexShader: A string containing the GLSL code for the vertex shader.fragmentShader: A string containing the GLSL code for the fragment shader.
On top of our file, let's declare a new shader material named MyShaderMaterial:
import { shaderMaterial } from "@react-three/drei"; const MyShaderMaterial = shaderMaterial( {}, ` void main() { gl_Position = projectionMatrix * modelViewMatrix * vec4(position, 1.0); }`, ` void main() { gl_FragColor = vec4(0.0, 0.0, 0.0, 1.0); } ` );
We will dive into the shader code in a moment.
To be able to use it declaratively with React Three Fiber, we use the extend method:
import { extend } from "@react-three/fiber"; // ... extend({ MyShaderMaterial });
Now we can replace the <meshBasicMaterial> with our new shader material:
import { shaderMaterial } from "@react-three/drei"; import { extend } from "@react-three/fiber"; const MyShaderMaterial = shaderMaterial( {}, ` void main() { gl_Position = projectionMatrix * modelViewMatrix * vec4(position, 1.0); }`, ` void main() { gl_FragColor = vec4(0.0, 0.0, 0.0, 1.0); } ` ); extend({ MyShaderMaterial }); export const ShaderPlane = ({ ...props }) => { return ( <mesh {...props}> <planeGeometry args={[1, 1]} /> <myShaderMaterial /> </mesh> ); };
You should see the same black plane as before. We didn't change anything yet, but we are now using a custom shader material.
To verify it is working, let's change the color we are returning in the fragment shader. Replace the gl_FragColor line with the following:
gl_FragColor = vec4(1.0, 0.0, 0.0, 1.0);
gl_FragColor is a predefined variable that represents the color of the fragment. It's a vec4 (a vector with 4 components) that represents the red, green, blue, and alpha channels of the color. Each component is a float between 0 and 1.
By setting the first component to 1.0, we are setting the red channel to its maximum value, which will result in a red color.
You should see a red plane in the middle of the screen:

Congratulations! You've just created your first shader material. It's a simple one, but it's a start.
Shader Code
Before we move on, let's setup our development environment to write shaders more comfortably.
You have two options to write shader code:
- Inline: You can write the shader code directly in the JavaScript file.
- External: You can write the shader code in a separate file with the
.glslextension and import it in your JavaScript file.
I usually prefer the inline approach inside proper material files, this way the shader code is close to the material declaration.
But to make it easier to write and read, I recommend using a syntax highlighter for GLSL. You can use the Comment tagget templates extension for Visual Studio Code. It will highlight the GLSL code inside the template strings.
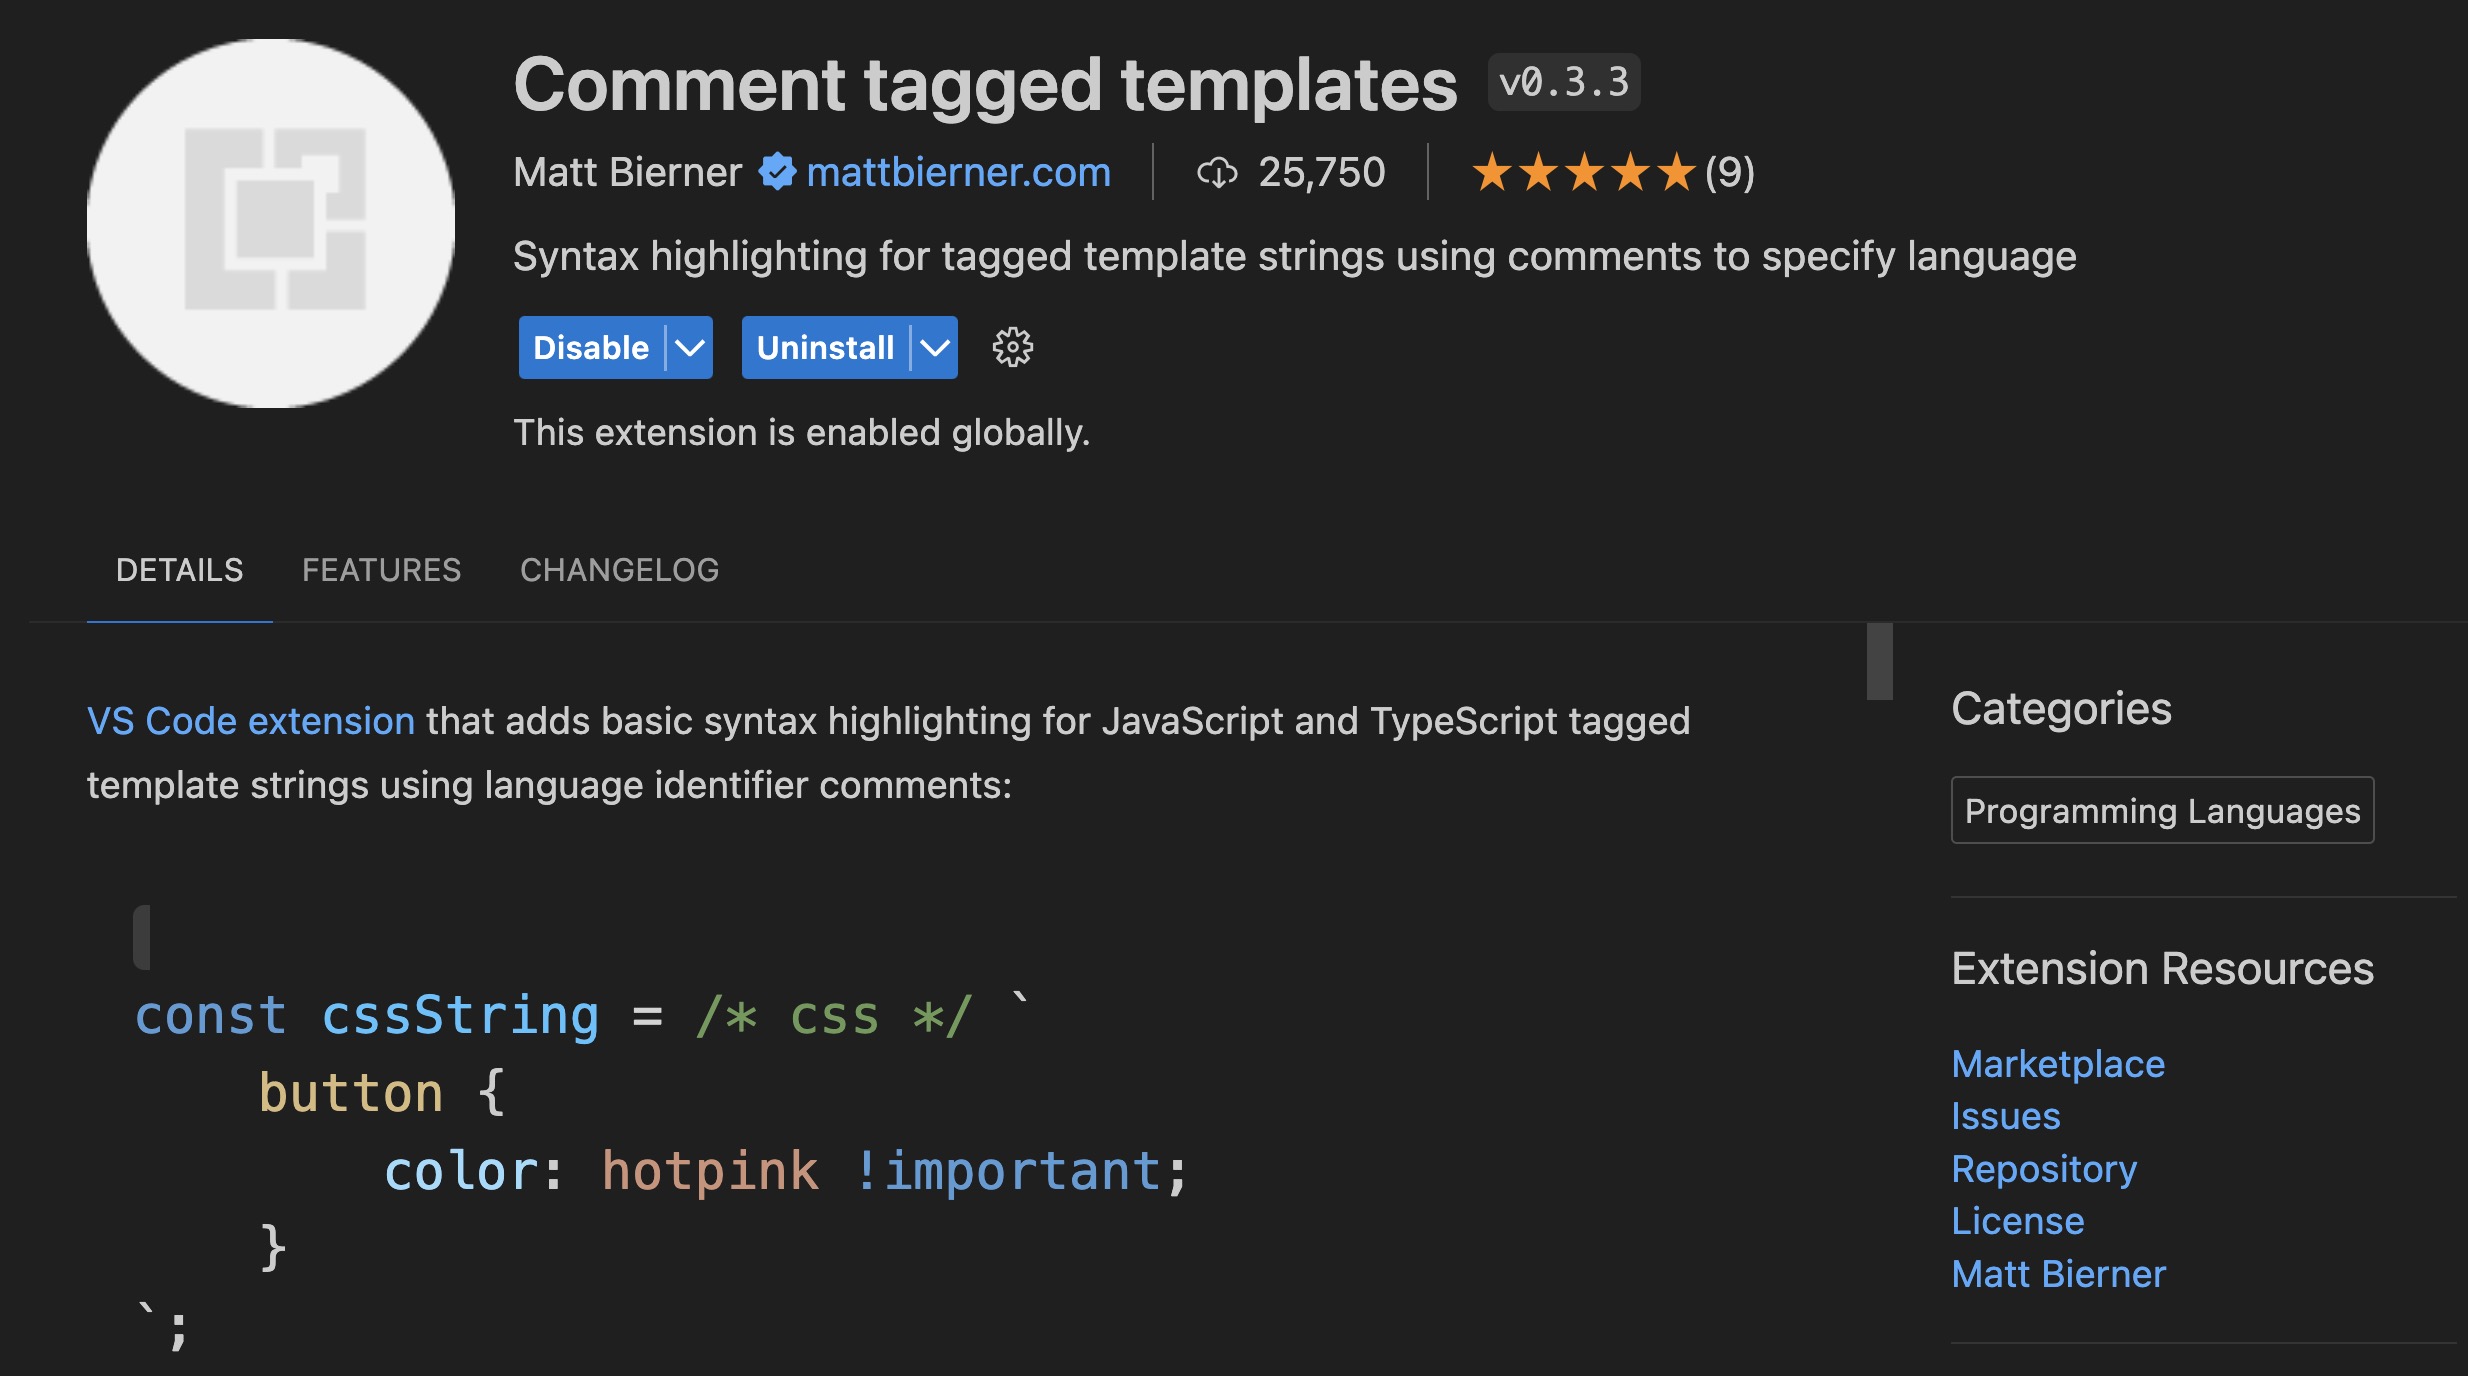
Once installed, to enable the syntax highlighter, you need to add the following comment at the beginning of the shader code:
const MyShaderMaterial = shaderMaterial( {}, /* glsl */ ` void main() { gl_Position = projectionMatrix * modelViewMatrix * vec4(position, 1.0); }`, /* glsl */ ` void main() { gl_FragColor = vec4(1.0, 0.0, 0.0, 1.0); } ` );
You should see the GLSL code highlighted in the template strings:
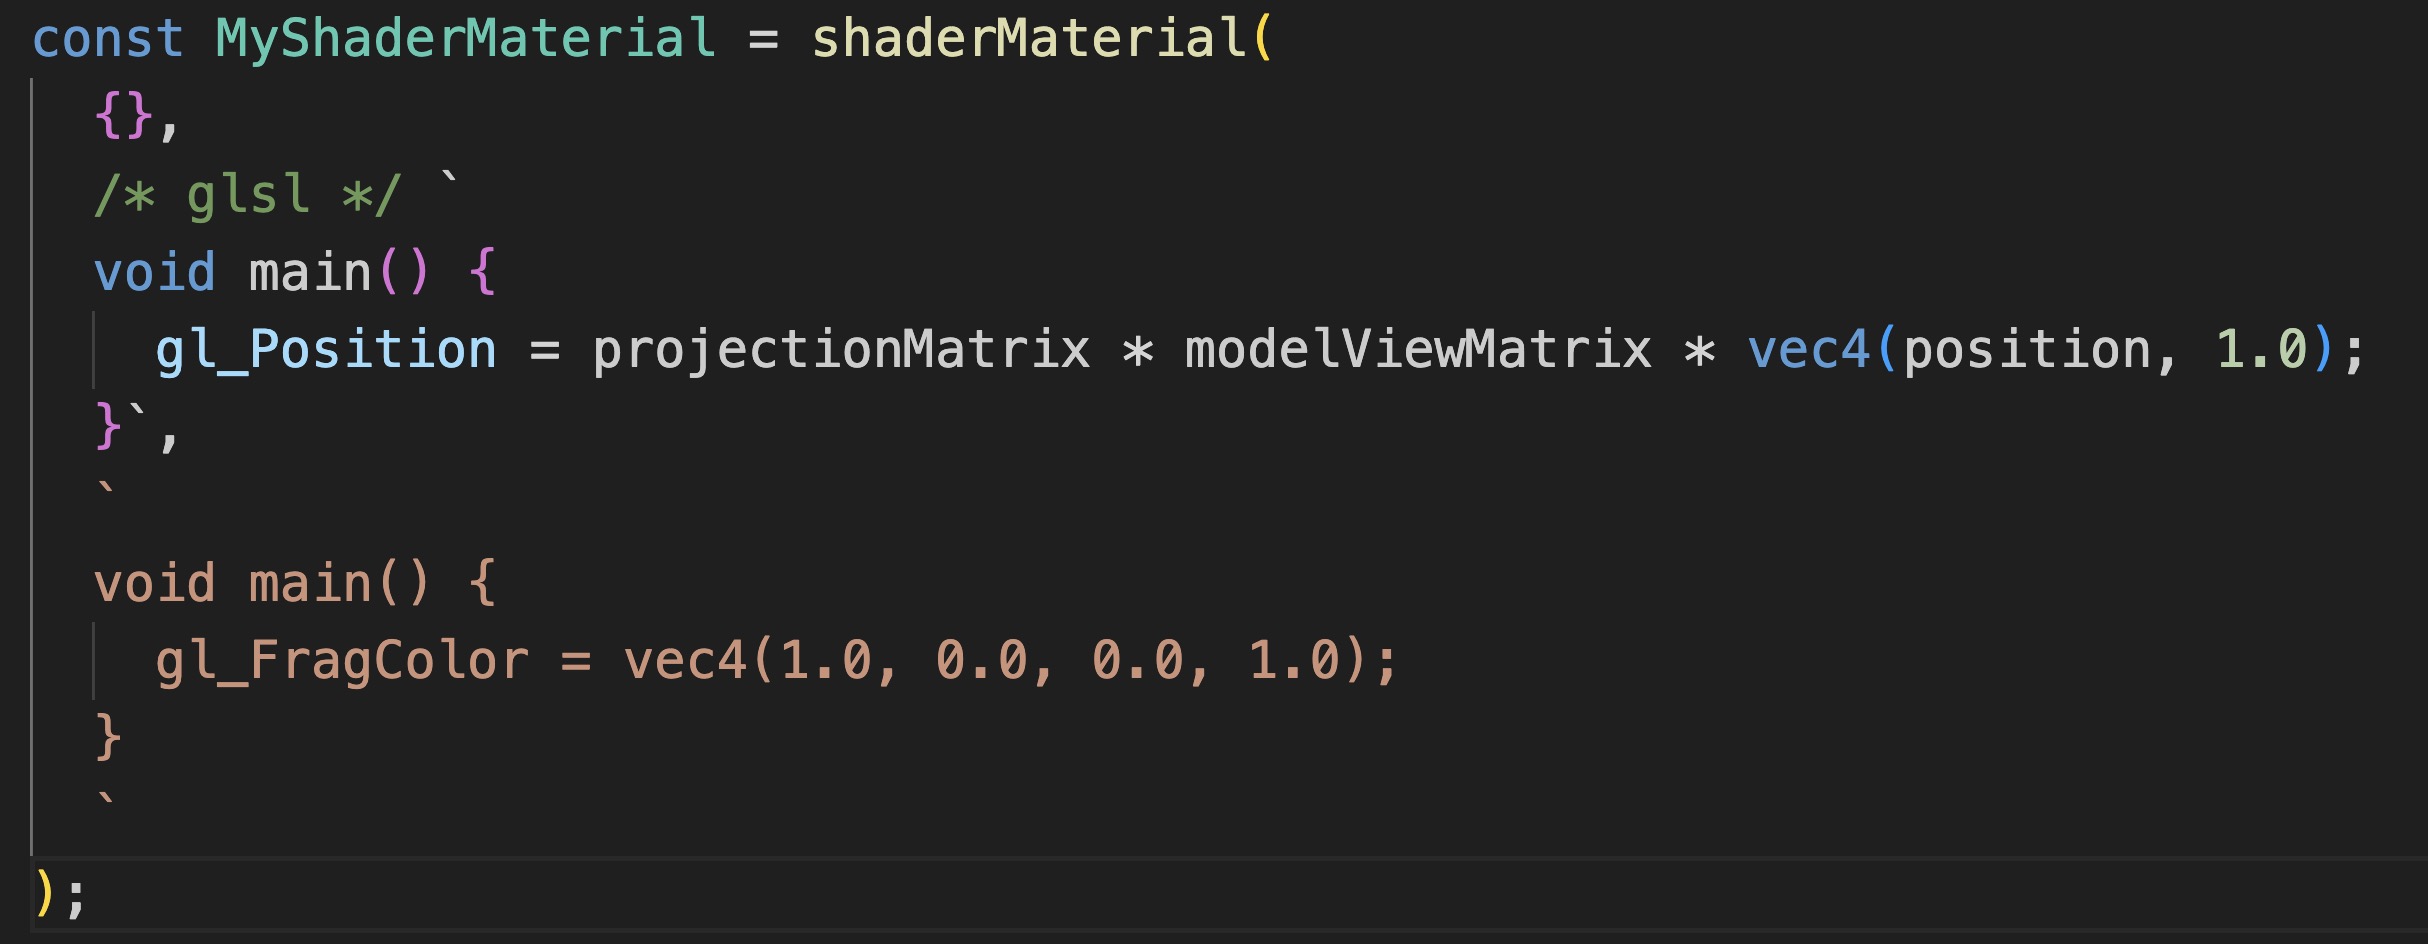
The vertex shader on top now has the correct syntax highlighting and is easier to read.
This is all you need for inline shader code. You can still decide to use an external file if you prefer to keep your shader code separate. Let's see how to do it.
Import GLSL Files
First, create a new folder named shaders in the src folder. Inside this folder, create two files: myshader.vertex.glsl and myshader.fragment.glsl and copy the respective shader code into each file.
myshader.vertex.glsl:
void main() { gl_Position = projectionMatrix * modelViewMatrix * vec4(position, 1.0); }
myshader.fragment.glsl:
void main() { gl_FragColor = vec4(1.0, 0.0, 0.0, 1.0); }
Feel free to use the naming convention you prefer, and to group your shaders in subfolders if you have many of them.
Then, to be able to import these files in our JavaScript file, we need to install the vite-plugin-glsl plugin as a development dependency:
yarn add vite-plugin-glsl --dev
Then, in your vite.config.js file, import the plugin and add it to the plugins array:
import react from "@vitejs/plugin-react"; import { defineConfig } from "vite"; import glsl from "vite-plugin-glsl"; // https://vitejs.dev/config/ export default defineConfig({ plugins: [react(), glsl()], });
Now you can import the GLSL files in your JavaScript file and use them as shader code:
import myShaderFragment from "./shaders/myshader.fragment.glsl"; import myShaderVertex from "./shaders/myshader.vertex.glsl"; const MyShaderMaterial = shaderMaterial({}, myShaderVertex, myShaderFragment);
Now we have a comfortable way to write and import shader code, we can start to explore the different parts of the shader code.
GLSL
The shader code is written in GLSL (OpenGL Shading Language). It's a C-like language, let's see the very basics.
Types
GLSL has several types, but the most common ones are:
- bool: A boolean value (
trueorfalse). - int: An integer number.
- float: A floating-point number.
- vectors: A collection of numbers.
vec2is a collection of 2 floating-point numbers (xandy),vec3is a collection of 3 floating-point numbers (x,y, andz), andvec4is a collection of 4 floating-point numbers(x,y,z, andw). Instead of usingx,y,z, andw, you can also user,g,b, andafor colors, they are interchangeable. - matrices: A collection of vectors. For example,
mat2is a collection of 2 vectors,mat3is a collection of 3 vectors, andmat4is a collection of 4 vectors.
Swizzling and manipulations
You can access the components of a vector using swizzling. For example, you can create a new vector by using the components of another vector:
vec3 a = vec3(1.0, 2.0, 3.0); vec2 b = a.xy;
In this example, b will be a vector with the x and y components of a.
You can also use swizzling to change the order of the components:
vec3 a = vec3(1.0, 2.0, 3.0); vec3 b = a.zyx;
In this example, b will be equal to vec3(3.0, 2.0, 1.0).
To create a new vector with all same components, you can use the constructor:
vec3 a = vec3(1.0);
In this example, a will be equal to vec3(1.0, 1.0, 1.0).
Operators
GLSL has the common arithmetic operators: +, -, *, /, +=, /=, *= and common comparison operators: ==, !=, >, <, >=, <=.
They need to be used with the correct types. For example, you can't add an integer to a float, you need to convert the integer to a float first:
int a = 1; float b = 2.0; float c = float(a) + b;
You can perform operations on vectors and matrices as well:
vec3 a = vec3(1.0, 2.0, 3.0); vec3 b = vec3(4.0, 5.0, 6.0); vec3 c = a + b;
Which is the same as:
vec3 c = vec3(a.x + b.x, a.y + b.y, a.z + b.z);
Functions
The entry point of the vertex and fragment shaders is the main function. It's the function that will be executed when the shader is called.
void main() { // Your code here }
void is the return type of the function. It means that the function doesn't return anything.
You can define your own functions as well:
float add(float a, float b) { return a + b; }
You can then call this function in the main function:
void main() { float result = add(1.0, 2.0); // ... }
GLSL provides many built-in functions for common operations like sin, cos, max, min, abs, round, floor, ceil, and many useful others like mix, step, length, distance, and more.
We will discover the essential ones and practice with them in the next lesson.
Loops and Conditions
GLSL supports for loops and if statements. They work similarly to JavaScript:
for (int i = 0; i < 10; i++) { // Your code here } if (condition) { // Your code here } else { // Your code here }
Logging / Debugging
As shader programs run for each vertex and fragment in parallel, it's not possible to use console.log to debug your code nor add breakpoints. This is what makes it difficult to debug shaders.
A common way to debug shaders is to use the gl_FragColor to visualize the values of your variables.
Compilation errors
If you make a mistake in your shader code, you will see a compilation error in the console. It will tell you the line and the type of error. It's not always easy to understand, but it's a good way to know where to look for the problem.
Let's remove the alpha channel from the gl_FragColor and see what happens:
void main() { gl_FragColor = vec4(1.0, 0.0, 0.0); }
You should see a compilation error in the console:
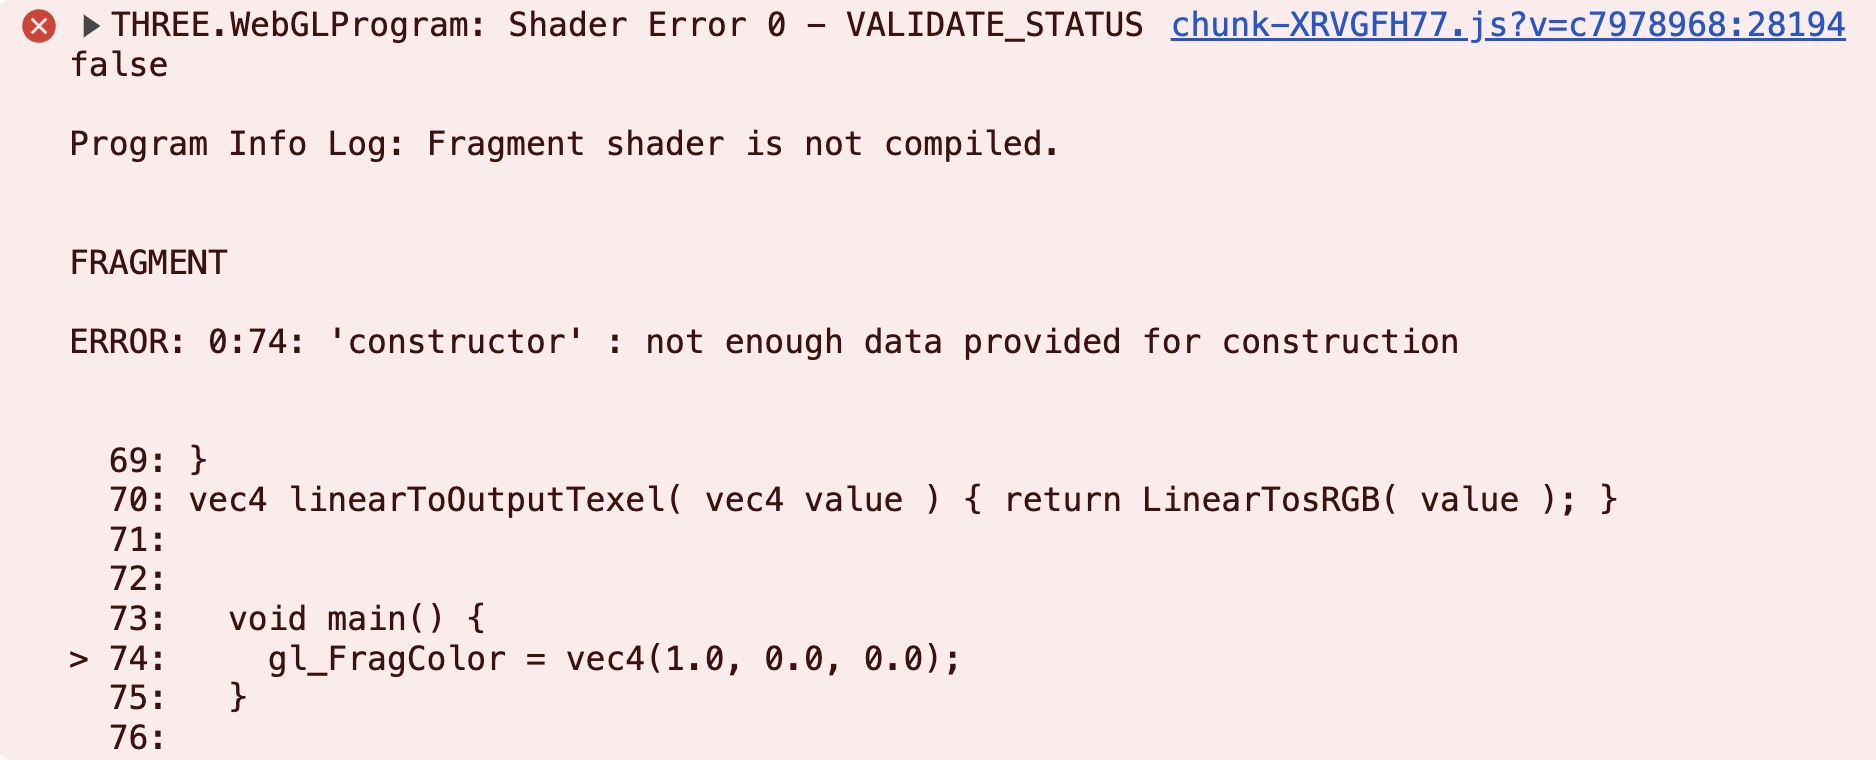
Stating us that the gl_FragColor expects 4 components, but we only provided 3.
Don't forget to restore the alpha channel to 1.0 to remove the error.
Uniforms
To pass data from the JavaScript code to the shader we use uniforms. They are constant across all vertices and fragments.
The projectionMatrix, modelViewMatrix, and position are examples of built-in uniforms that are automatically passed to the shader.
Let's create a custom uniform to pass a color to the shader. We will use it to colorize the plane. We will call it uColor. It's a good practice to prefix the name of the uniform with u to make it clear that it's a uniform in our code.
First, let's declare it in the uniforms object of the shaderMaterial:
import { Color } from "three"; // ... const MyShaderMaterial = shaderMaterial( { uColor: new Color("pink"), } // ... ); // ...
Then, we can use it in the fragment shader:
uniform vec3 uColor; void main() { gl_FragColor = vec4(uColor, 1.0); }
You should see the plane colored in pink:

Here, the pink color is the default value of the uniform. We can change it directly on the material:
<MyShaderMaterial uColor={"lightblue"} />
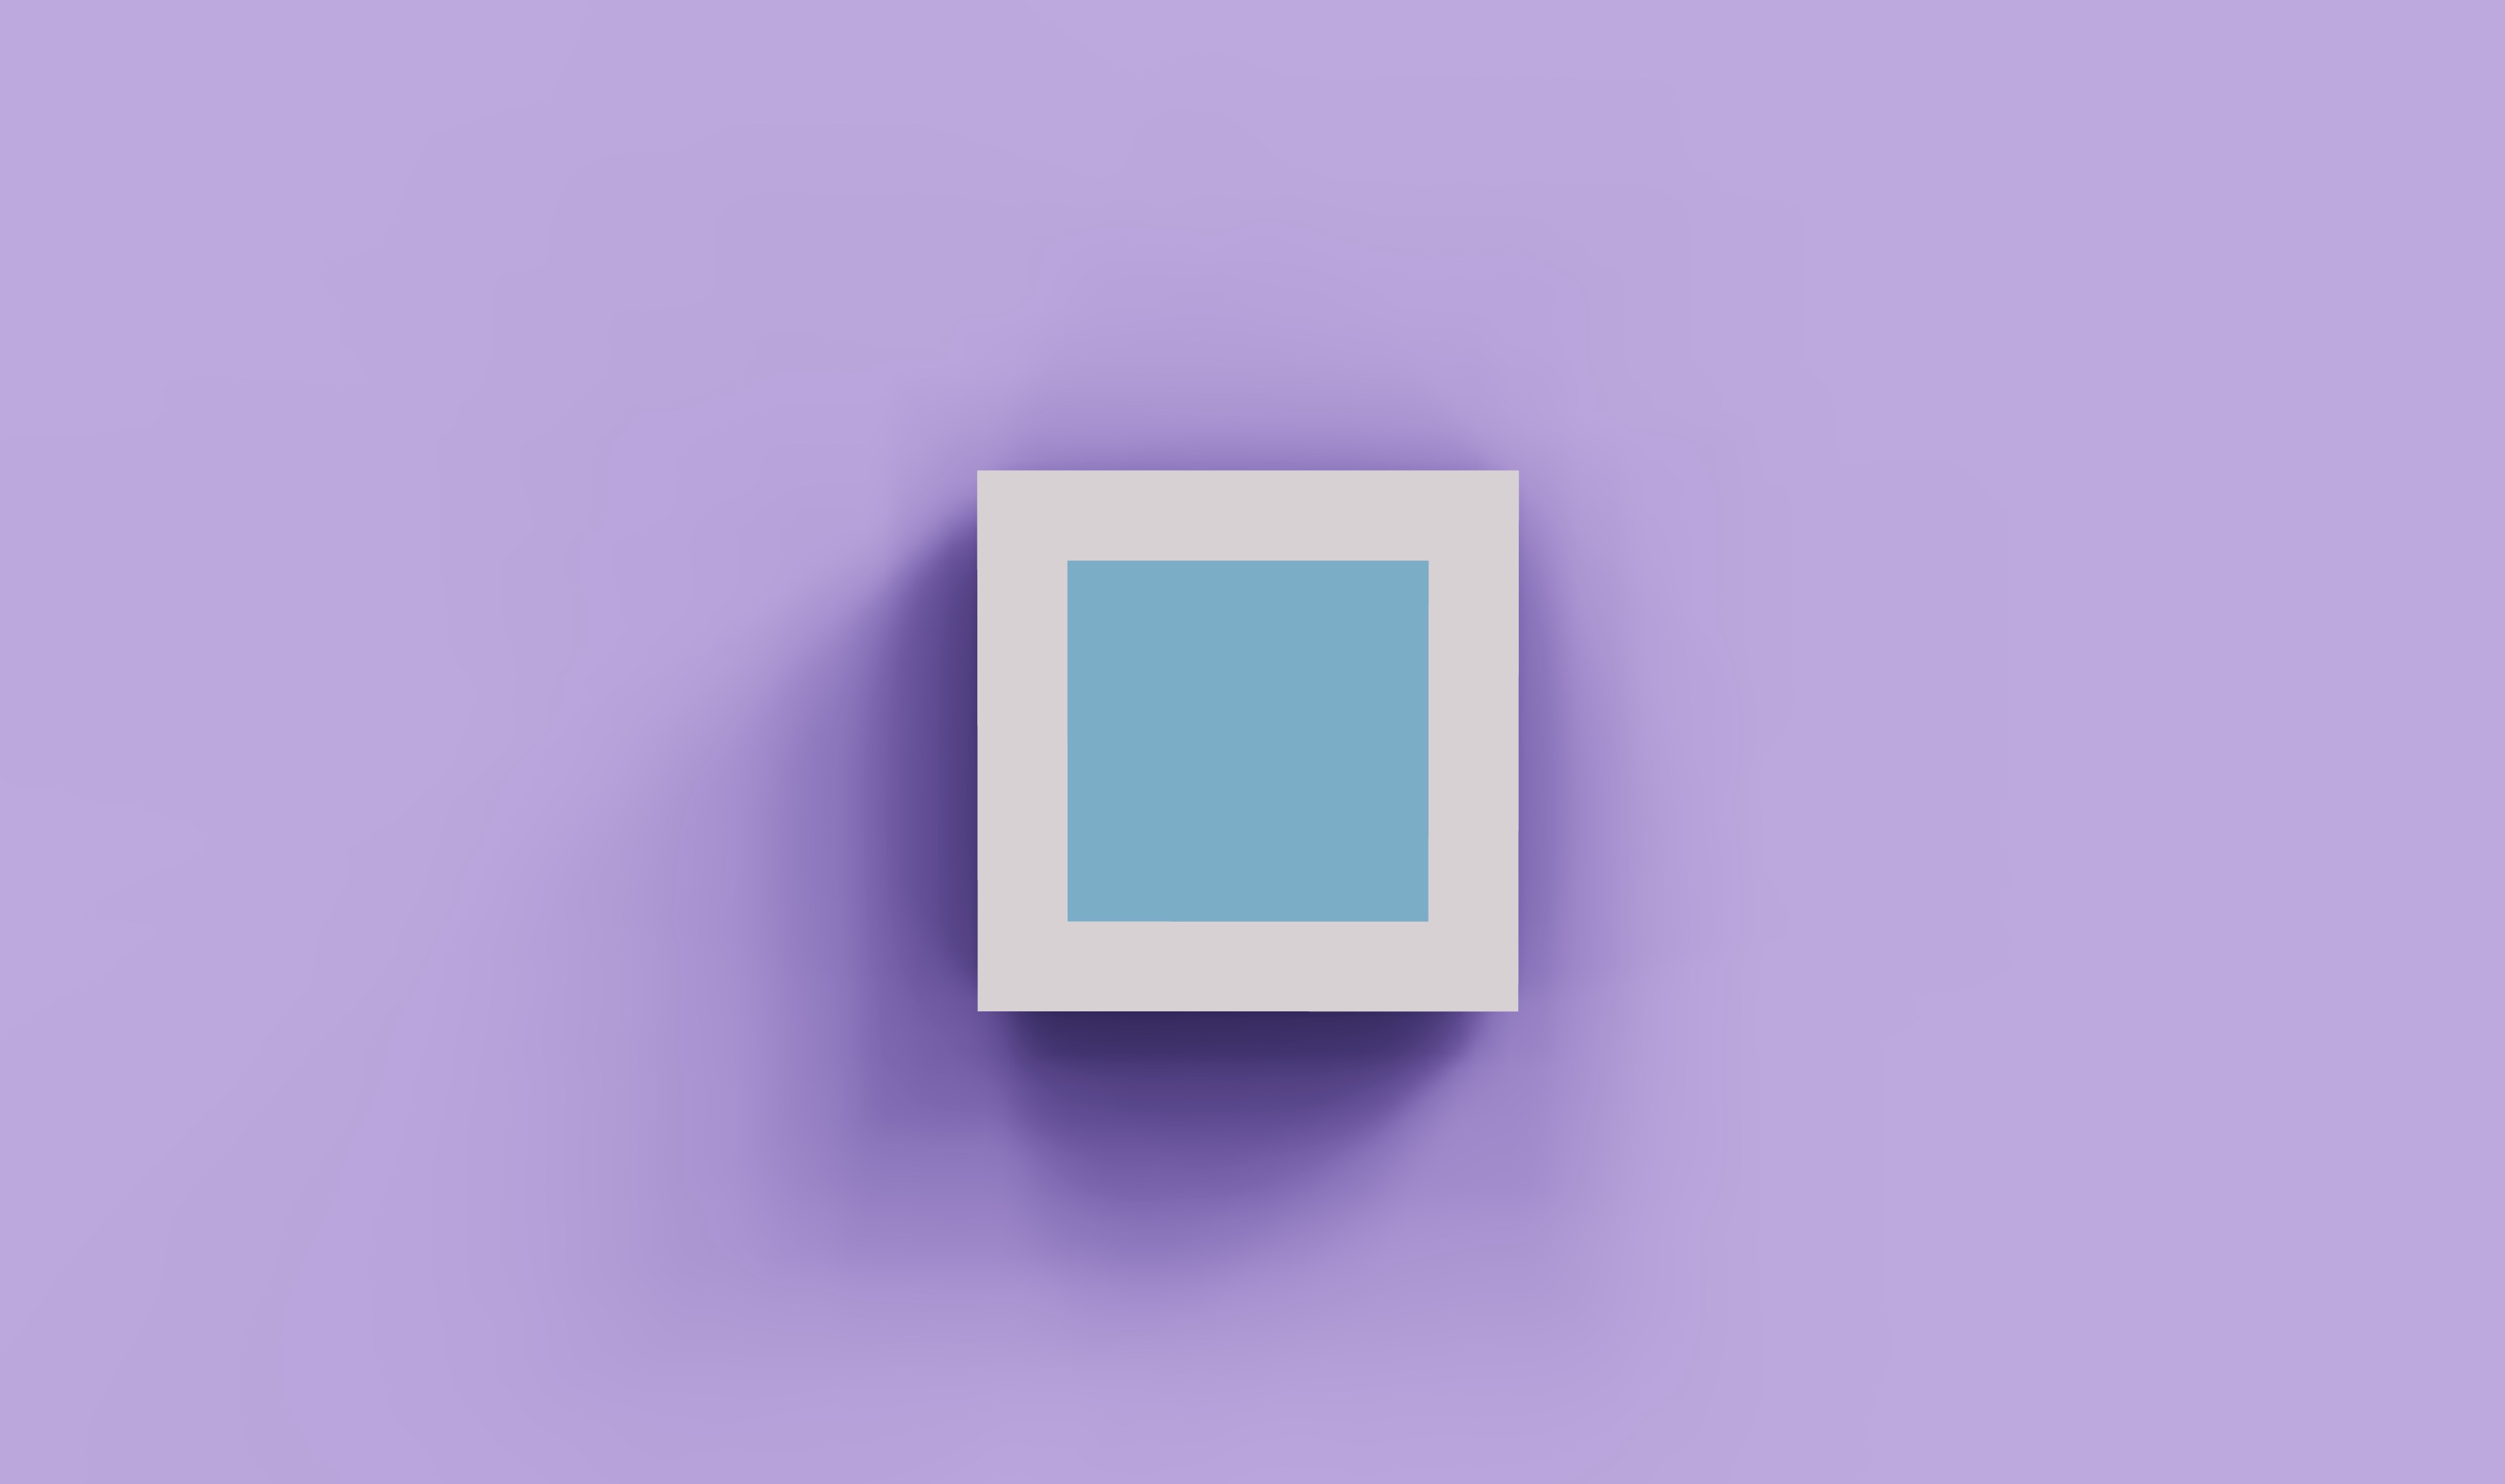
The plane is now colored in light blue.
Both the vertex and fragment shaders can access the uniforms. Let's add the time as a second uniform to the vertex shader to move the plane up and down:
End of lesson preview
To get access to the entire lesson, you need to purchase the course.